Git: Difference between revisions
| Line 4: | Line 4: | ||
== Basic == | == Basic == | ||
=== Branching === | === Branching === | ||
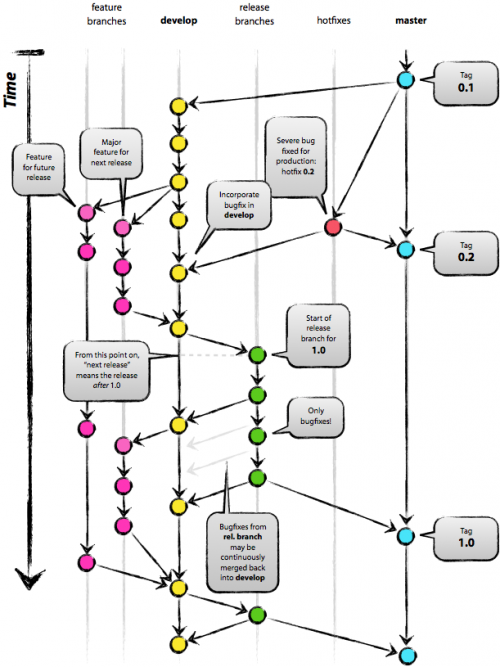
[[File:Git branch.png| | [[File:Git branch.png|500px||thumb|branching model]] | ||
git에서의 브랜치 사용은, 단순한 명령어를 사용할 줄 아는 것보다 어떤 구조로 브랜치가 뻗어나가고, 통합되는지를 아는 것이 더 중요하다. 자동으로 생성되는 master branch 에는 Tag 와 같이 배포된 버전만을 관리하도록 한다. 그리고, develop branch 에는 현재 진행중인 모든 변경사항들이 적용될 수 있도록 한다. 그리고, 새로운 기능을 개발해야 하는 상황이라면 develop branch에서 새로운 branch 를 파생하여 개발하도록 한다(이건 약간 다를 수있다). hotfix 의 경우, master branch 에서 파생하여 수정 후, 바로 적용할 수 있도록 한다. | git에서의 브랜치 사용은, 단순한 명령어를 사용할 줄 아는 것보다 어떤 구조로 브랜치가 뻗어나가고, 통합되는지를 아는 것이 더 중요하다. 자동으로 생성되는 master branch 에는 Tag 와 같이 배포된 버전만을 관리하도록 한다. 그리고, develop branch 에는 현재 진행중인 모든 변경사항들이 적용될 수 있도록 한다. 그리고, 새로운 기능을 개발해야 하는 상황이라면 develop branch에서 새로운 branch 를 파생하여 개발하도록 한다(이건 약간 다를 수있다). hotfix 의 경우, master branch 에서 파생하여 수정 후, 바로 적용할 수 있도록 한다. | ||
Revision as of 07:49, 26 April 2016
Overview
Git 사용법 정리.
Basic
Branching
git에서의 브랜치 사용은, 단순한 명령어를 사용할 줄 아는 것보다 어떤 구조로 브랜치가 뻗어나가고, 통합되는지를 아는 것이 더 중요하다. 자동으로 생성되는 master branch 에는 Tag 와 같이 배포된 버전만을 관리하도록 한다. 그리고, develop branch 에는 현재 진행중인 모든 변경사항들이 적용될 수 있도록 한다. 그리고, 새로운 기능을 개발해야 하는 상황이라면 develop branch에서 새로운 branch 를 파생하여 개발하도록 한다(이건 약간 다를 수있다). hotfix 의 경우, master branch 에서 파생하여 수정 후, 바로 적용할 수 있도록 한다.
새로운 기능을 위한 branch 를 생성할 때, 두 가지 방식을 사용할 수 있다. 하나는 master branch 에서 파생하는 방법이고, 다른 하나는 develop branch 에서 파생하는 방법이다. develop branch 에서 파생할 경우에는 현재 적용을 위해 테스트 중인 모든 기능과의 호환성을 함께 테스트할 수 있지만 그만큼 현재 배포중인 버전과의 차이가 많이 난다는 문제가 있다. 하지만, master branch에서 파생하는 경우는, 정 반대의 문제가 발생하게 된다.
여기서 중요한 점은, branching 을 하는 과정에서는 어떠한 정해진 룰이 없다는 것이다. 그냥 각기 상황에 맞는 방식을 적용하여 사용하면 된다.
branch
branch 를 생성/삭제/변경 한다. <source lang=bash> $ git branch [--color[=<when>] | --no-color] [-r | -a] [--list] [-v [--abbrev=<length> | --no-abbrev]] [--column[=<options>] | --no-column] [(--merged | --no-merged | --contains) [<commit>]] [<pattern>...] $ git branch [--set-upstream | --track | --no-track] [-l] [-f] <branchname> [<start-point>] $ git branch (--set-upstream-to=<upstream> | -u <upstream>) [<branchname>] $ git branch --unset-upstream [<branchname>] $ git branch (-m | -M) [<oldbranch>] <newbranch> $ git branch (-d | -D) [-r] <branchname>... $ git branch --edit-description [<branchname>] </source>
checkout
해당 브랜치 또는 특정 커밋시점으로 소스를 되돌린다. 아직 staging 에 있지 않은 파일에 checkout 을 적용하면 파일을 수정 전으로 되돌린다.
-b
브랜치 생성과 동시에 checkout 까지 동시에 한다. <source lang=bash> $ git checkout -b feature_1212 Switched to a new branch 'feature_1212' </source>
clone
-b, --branch
clone 시 특정 브랜치를 지정하여 clone 할 때 사용하는 옵션이다.
$ git clone -b <branch> <remote_repo>

Example
$ git clone -b my-branch git@github.com:user/myproject.git

Alternative (no public key setup needed):
$ git clone -b my-branch https://git@github.com/username/myproject.git

With Git 1.7.10 and later, add --single-branch to prevent fetching of all branches. Example, with OpenCV 2.4 branch:
$ git clone -b 2.4 --single-branch https://github.com/Itseez/opencv.git opencv-2.4
pull
pull all branches
$ git pull --all
commit
--amend
기존의 commit 에 내용 수정하기
$ git commit --amend
rebase
$ git checkout experiment
$ git rebase master
show-brarnch
브랜치와 커밋 내용을 확인한다.
$ git show-branch
[master] Oversized message cut and substitute
-a, --all
remote-tacking 브랜치와 로컬 브랜치 모두를 보여준다.
$ git show-branch -a
* [master] Oversized message cut and substitute
 ! [origin/HEAD] Oversized message cut and substitute
  ! [origin/develop] Oversized message cut and substitute
   ! [origin/master] Oversized message cut and substitute
----
*+++ [master] Oversized message cut and substitute
diff
HEAD
현재 파일들의 상태(아직 commit 되지 않은 상태의 변경도 포함)와 HEAD 와의 차이를 보여준다.
mv
파일, 심볼릭링크 또는 디렉토리의 이동 및 rename 을 한다. git 디렉토리에서 단순히 git 명령어가 아닌, unix/linux mv 명령어로 파일을 옮기게 되면 git 에서는 파일이동이 아닌, 파일 삭제, 새로운 파일 생성으로 받아들이게 된다.
만약 unix/linux 명령어 mv 로 파일이동을 하게 될 경우, 파일 트래킹 하기가 정말 어려워진다. git에서는 가급적 git mv를 사용하도록 하자.
-n, --dry-run
실제로 파일이동을 하지 않는다. 단지 어떻게 되는지만을 보여준다.
$ git mv -n conf/freeswitch.xml ./
Checking rename of 'conf/freeswitch.xml' to 'freeswitch.xml'
Renaming conf/freeswitch.xml to freeswitch.xml
remote
Manage the set of repositories ("remotes") whose branches you track.
update
Fetch updates for a named set of remotes in the repository as defined by remotes.<group>. If a named group is not specified on the command line, the configuration parameter remotes.default will be used; if remotes.default is not defined, all remotes which do not have the configuration parameter remote.<name>.skipDefaultUpdate set to true will be updated. (See git-config(1)).
With --prune option, prune all the remotes that are updated.
$ git remote update
Fetching origin
remote: Counting objects: 18, done.
remote: Total 18 (delta 7), reused 7 (delta 7), pack-reused 11
Unpacking objects: 100% (18/18), done.
From https://github.com/pchero/asterisk-zmq
   2109230..9991691  master     -> origin/master
   2109230..43c3fbb  devel      -> origin/devel
 * [new tag]         v1.5       -> v1.5
archive
config
git 환경변수 값을들 설정/변경/삭제 한다.
$ git config [options]
--global
global config file 을 사용한다.
$ git config --global core.editor "vim"
See also
- http://stackoverflow.com/questions/10312521/how-to-fetch-all-git-branches - How to fetch all git branches
- https://git-scm.com/book/ko/v1/Git-%EB%B8%8C%EB%9E%9C%EC%B9%98-Rebase%ED%95%98%EA%B8%B0 - Git-브랜치-Rebase하기
- https://progit.org/ - progit book
References
<references />
